Aws Cognito Java Sdk Example
Integrate Java with AWS Cognito — Developer Tutorial
In this developer tutorial, we are going to learn how to make an integration with Amazon Cognito using the AWS SDK for Java by providing all the necessary code samples and documentation. We are going to leverage AWS Cognito authentication and authorization into a Java application, in addition to using the JWT tokens provided by AWS.
What is Amazon Cognito?
Amazon Cognito lets you add user sign-up, sign-in, and access control to your web and mobile apps quickly and easily. Amazon Cognito scales to millions of users and supports sign-in with social identity providers, such as Apple, Facebook, Google, and Amazon, and enterprise identity providers via SAML 2.0 and OpenID Connect.
You need to create an User Pool and set all the necessary settings as per you requirements.
Lets code
We need to create a Maven project in Java.
To start with the integration, we have to declare the AWS SDK dependencies in the pom.xml file.
Maven Dependencies:
          <dependency>
<groupId>com.amazonaws</groupId>
<artifactId>aws-java-sdk-cognitoidp</artifactId>
</dependency>          <dependency>
<groupId>com.amazonaws</groupId>
<artifactId>aws-java-sdk</artifactId>
</dependency>          <dependency>
<groupId>com.amazonaws</groupId>
<artifactId>aws-java-sdk-core</artifactId>
</dependency>
The second step is to create our AWSCognitoIdentityProvider using the credentials we have in the AWS Credentials which will act as a client between Java and Cognito.
          private AWSCognitoIdentityProvider createCognitoClient() {
            AWSCredentials cred = new BasicAWSCredentials(access_key, secret_key);
            AWSCredentialsProvider credProvider = new AWSStaticCredentialsProvider(cred);
            return AWSCognitoIdentityProviderClientBuilder.standard()
            .withCredentials(credProvider)
            .withRegion(region)
            .build();
}
Once we have defined the Cognito client, we can start calling the API services. Let's look at how to sign up, confirm sign up, sign in, get user authentication and authorization, etc.

Sign Up Implementation
While implementing the Sign Up functionality, you get a set of default attributes; these attributes in Cognito are called standard attributes. In addition to these, Cognito also allows you to add custom attributes to your specific User pool definition in the AWS console.
Cognito standard attributes are: address, email, birthdate, family name, gender, given name, location, middle name, last name, nickname, phone number, picture, preferred username, profile, time zone, 'updated at' time, and website.
In this sign-up implementation we are going to use the email as username and add only a single standard attribute .
          public SignUpResult signUp(String name, String email, String password) {
            SignUpRequest request = new SignUpRequest().withClientId(clientId)
            .withUsername(email)
            .withPassword(password)
            .withUserAttributes(
            new AttributeType()
            .withName("name")
            .withValue(name));
            SignUpResult result = client.signUp(request);
            return result;
}
Message Action: The default is to send a verification code or link via mail whichever option choose while creating the App Client.
If you've chosen code you need to add the below method in your application to verify the code.
Confirm Sign Up Implementation
After successful Sign Up the user will be sent a verification code to the email address for confirmation of the user and verification of the email address.
In the confirm sign up implementation we would be using the email set while sign up and the code sent by Cognito via mail
          public ConfirmSignUpResult confirmSignUp(String email, String confirmationCode) {
            ConfirmSignUpRequest confirmSignUpRequest = new                  ConfirmSignUpRequest().withClientId(clientId).withUsername(email).withConfirmationCode(confirmationCode);
            return client.confirmSignUp(confirmSignUpRequest);
}
If the code entered is incorrect or expired it may throw few exception such as ExpiredCodeException or CodeMismatchException. After this the user status in the pool will change to confirmed and verified. So the user can now sign in.
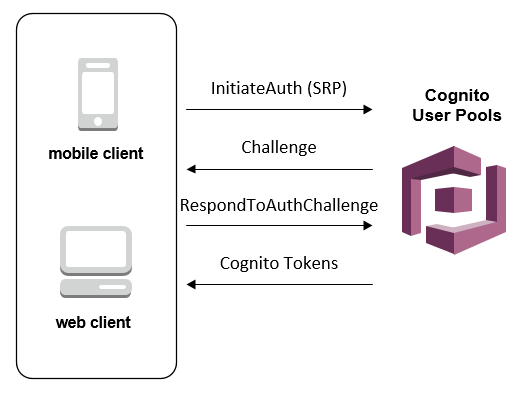
Sign In Implementation
In this example, we are going to call Admin Initiate Auth Request which initiates the authentication flow as an administrator. If the action is successful, it returns an authentication response with an access token, 'expires in' time, ID token, refresh token and a token type.
          public Map<String, String> login(String email, String password) {
            Map<String, String> authParams = new LinkedHashMap<String, String>() {{
            put("USERNAME", email);
            put("PASSWORD", password);
            }};              AdminInitiateAuthRequest authRequest = new AdminInitiateAuthRequest()
              .withAuthFlow(AuthFlowType.ADMIN_NO_SRP_AUTH)
              .withUserPoolId(userPool)
              .withClientId(clientId)
              .withAuthParameters(authParams);
              AdminInitiateAuthResult authResult = client.adminInitiateAuth(authRequest);
              AuthenticationResultType resultType = authResult.getAuthenticationResult();
              return new LinkedHashMap<String, String>() {{
              put("idToken", resultType.getIdToken());
              put("accessToken", resultType.getAccessToken());
              put("refreshToken", resultType.getRefreshToken());
              put("message", "Successfully login");
              }};            }
If the user credentials are incorrect it will throw an exception. You can also add Auth Challenge Request if you wish to add MFA, Password Verifier, etc. in your system
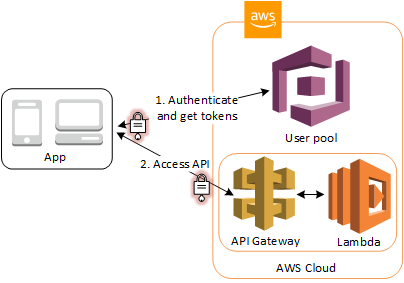
Authentication & Authorization Flow
Once the user has signed in to Amazon Cognito, it returns three JSON Web Tokens(JWT): ID token, access token and refresh token. In this part, I'm going to explain how we can use the access token as a bearer access token in our Java Web Application.
Flow Details:
- The client authenticates against a user pool.
- The user pool assigns three JSON Web Tokens (JWT) — ID, access and refresh — to the client.
- The Access JSON Web Token is passed to the identity pool, and a role is chosen via the JWT claims. The user receives IAM temporary credentials with privileges that are based on the IAM role that was mapped to the group that the user belongs to.
- Then, the user can make calls to other services on AWS and applications such as databases. These privileges are dictated by IAM policies.
For this implementation, we are going to use the Maven Nimbus Jose + JWT library dependency by adding it to our pom.xml file
          <dependency>
            <groupId>com.nimbusds</groupId>
            <artifactId>nimbus-jose-jwt</artifactId>
            <version>5.7</version>
</dependency>
The Nimbus Jose + JWT library provides a framework for all the steps to validate a JSON Web Token. You can also use other libraries recommended by jwt.io. The JWT validation steps are:
- JWT Parsing: The access token provided is parsed as a JWT. If the parsing fails, the token will be considered invalid.
- Algorithm Check: The JSON Web Key algorithm specified in the JSON Web Token header is checked. If a token with an unexpected algorithm is received, the token will be immediately rejected.
- Signature Check: In this step, the digital signature is verified.
- JWT Claims Check: The JSON Web Token claims set is validated; to verify JWT claims, the following steps are necessary:
a. Verify that the token has not expired.
b. The audience (aud) claim should match the app client ID created in the Amazon Cognito User Pool.
c. The issuer (iss) claim should match the user pool. For example, a user pool created in the selected region has an 'iss' value of: https://cognito-idp.<region>.amazonaws.com/<userpoolID>.
d. Check the token_use claim.
e. If you are only accepting the access token in your Web APIs, its value must be 'access.'
f. If you are only using the ID token, its value must be 'id.'
g. If you are using both ID and access tokens, the token_use claim must be either 'id' or 'access.'
h. You can now trust the claims inside the token.
Implementation
Once we extract the access token from the Authentication header of the request, we will use the ConfigurableJWTProcessor
          public Authentication authenticate(HttpServletRequest request) throws Exception {
            String idToken = request.getHeader(this.jwtConfiguration.getHttpHeader());
            if (idToken != null) {
            JWKSource jwkSource = new RemoteJWKSet(new URL(jwkUrl));
            JWSAlgorithm jwsAlgorithm = JWSAlgorithm.RS256;
            JWSKeySelector keySelector = new JWSVerificationKeySelector(jwsAlgorithm, jwkSource);
            configurableJWTProcessor.setJWSKeySelector(keySelector);
            JWTClaimsSet claims = this.configurableJWTProcessor.process(this.getBearerToken(idToken),null);
            validateIssuer(claims);
            verifyIfAccessToken(claims);
            String username = claims.getClaims().get("username").toString();
            if (username != null) {
            List<GrantedAuthority> grantedAuthorities =            of( new SimpleGrantedAuthority("ROLE_USER"));
            User user = new User(username, "",            of());
            return new CognitoJwtAuthentication(username, claims, grantedAuthorities);
            }
            }
            return null;
            }
}          private void validateIssuer(JWTClaimsSet claims) throws Exception {
            if (!claims.getIssuer().equals(userPoolId)) {
            throw new Exception(String.format("Issuer %s does not match cognito idp %s", claims.getIssuer(), this.jwtConfiguration.getUserPoolUrl()));
            }
}private void verifyIfAccessToken(JWTClaimsSet claims) throws Exception {
              if (!claims.getClaim("token_use").equals("access")) {
              throw new Exception("JWT Token is not an ID Token");
              }
}
You can use this authenticate method if you add a Security Configuration to your application.
What if Token expires?
Access & ID tokens have an expiry time after which you cannot use the token for access or Identification. In this case, we make use of the Refresh token which will be used to re-generate the ID & Access token.

          public Map<String, String> refreshToken(String refreshToken) {
            Map<String, String> authParams = new LinkedHashMap<String, String>() {{
            put("REFRESH_TOKEN", refreshToken);
            }};
            InitiateAuthRequest authRequest = new InitiateAuthRequest()
            .withAuthFlow(AuthFlowType.REFRESH_TOKEN_AUTH)
            .withClientId(clientId)
            .withAuthParameters(authParams);
            InitiateAuthResult authResult = client.initiateAuth(authRequest);
            AuthenticationResultType resultType = authResult.getAuthenticationResult();
            return new LinkedHashMap<String, String>() {{
            put("idToken", resultType.getIdToken());
            put("accessToken", resultType.getAccessToken());
            put("message", "Successfully login");
            }};
}
Conclusions
Developers must go through the process of creating the user, passwords, roles, and access management platform, by not implementing a user management service on the cloud such as Amazon Cognito, which consumes a lot of time and does not necessarily contribute greater value to the client's final solution.
Amazon Cognito is a fully managed service that scales to millions of users by assigning them to standards-based groups such as OAuth 2.0, SAML 2.0, and OpenID Connect. This allows us to have full control of the user management in our Java application without writing any backend code or managing any type of infrastructure. As a result of this, project development time is improved and the developer is able to focus on the business logic of the application to be developed.
Source: https://medium.com/@warrenferns/integrate-java-with-aws-cognito-developer-tutorial-679e6e608951
0 Response to "Aws Cognito Java Sdk Example"
Post a Comment